
<?phpnamespaceapp\index\controller;useAlibabaCloud\Client\AlibabaCloud;useAlibabaCloud\Client\Exception\ClientException;useAlibabaCloud\Client\Exception\ServerException;classAliSmsUtil{private$accessKeyId;private$accessKeySecret;private$signName;private$templateCode;publicfunction__construct($accessKeyId,$accessKeySecret,$signName,$templateCode){$this->accessKeyId=$accessKeyId;$this->accessKeySecret=$accessKeySecret;$this->signName=$signName;$this->templateCode=$templateCode;AlibabaCloud::accessKeyClient($accessKeyId,$accessKeySecret)->regionId('cn-hangzhou')->asDefaultClient();}/***发送短信**@paramstring$mobile手机号码*@paramarray$template模板参数*@returnbool*@throwsClientException*@throwsServerException*/publicfunctionsendSms($mobile,$template){$params=['PhoneNumbers'=>$mobile,'SignName'=>$this->signName,'TemplateCode'=>$this->templateCode,'TemplateParam'=>json_encode($template),];$result=AlibabaCloud::rpc()->product('Dysmsapi')->version('2017-05-25')->action('SendSms')->method('POST')->host('dysmsapi.aliyuncs.com')->options(['query'=>$params,])->request();return$result->toArray()['Code']=='OK';}}以上代码需要依赖阿里云SDKforPHP和阿里云短信SDKforPHP,可以通过composer进行引入和配置。同时需要注意,以上代码仅为一个示例,具体实现需要根据实际业务需求进行调整和完善。使用方法<?phpuseapp\index\controller\AliSmsUtil;$accessKeyId='yourAccessKeyId';$accessKeySecret='yourAccessKeySecret';$signName='yourSignName';$templateCode='yourTemplateCode';$smsUtil=newAliSmsUtil($accessKeyId,$accessKeySecret,$signName,$templateCode);$mobile='12345678901';$template=['code'=>'123456',];$isSuccess=$smsUtil->sendSms($mobile,$template);if($isSuccess){echo'短信发送成功';}else{echo'短信发送失败';}以上代码中,$accessKeyId、$accessKeySecret、$signName和$templateCode需要替换为您自己的阿里云短信服务相关配置,$mobile和$template为具体的短信接收手机号和模板参数。具体的发送短信逻辑可以根据实际业务需求进行调整和完善。

假设您已经获得了用户的加密数据(encryptedData)、初始向量(iv)、session_key和appid:<?phpnamespaceapp\index\controller;usethink\Controller;classWXPhoneUtilextendsController{/***解密微信用户手机号**@paramstring$encryptedData加密数据*@paramstring$sessionKey会话密钥*@paramstring$iv初始向量*@returnstring*@throwsException*/publicfunctiondecodePhone($encryptedData,$sessionKey,$iv){$encryptedData=base64_decode($encryptedData);$sessionKey=base64_decode($sessionKey);$iv=base64_decode($iv);$decryptedData='';//解密后的数据$errorCode=openssl_decrypt($encryptedData,'AES-128-CBC',$sessionKey,OPENSSL_RAW_DATA,$iv,$decryptedData);if($errorCode==0){$decryptedData=json_decode($decryptedData,true);return$decryptedData['phoneNumber'];}else{thrownewException('解密失败');}}}以上是一个基本的TP5.0代码,具体实现需要根据实际业务需求进行调整和完善。需要注意的是,以上代码需要依赖OpenSSL扩展,以支持AES-128加密算法。

<?phpnamespaceapp\index\controller;usethink\Controller;useEasyWeChat\Foundation\Application;useEasyWeChat\Payment\Order;useEasyWeChat\Payment\Payment;classPayextendsController{private$app;private$payment;publicfunction_initialize(){$config=config('wechat');$this->app=newApplication($config);$this->payment=$this->app->payment;}/**发起微信支付*/publicfunctionwxpay(){$openid=session('openid');$order=newOrder(['body'=>'商品描述','out_trade_no'=>'商户订单号','total_fee'=>1,//单位:分'trade_type'=>'JSAPI','openid'=>$openid,'notify_url'=>'http://example.com/notify',//支付结果通知网址,如果不设置则会使用配置里的默认地址]);$result=$this->payment->prepare($order);if($result->return_code=='SUCCESS'&&$result->result_code=='SUCCESS'){$prepayId=$result->prepay_id;$jssdk=$this->app->jssdk;$config=$jssdk->sdkConfig($prepayId);$this->assign('config',$config);return$this->fetch();}else{$this->error('支付失败');}}/**微信支付异步通知*/publicfunctionnotify(){$payment=$this->payment;$response=$payment->handleNotify(function($notify,$successful){$outTradeNo=$notify->out_trade_no;if($successful){//支付成功}else{//支付失败}returntrue;});return$response;}}以上代码使用EasyWeChat封装的微信支付SDK,具体实现需要在config目录下创建wechat.php配置文件并在其中配置微信支付相关参数。同时需要注意,以上代码仅为一个示例,具体实现需要根据实际业务需求进行调整和完善。

创建表首先,我们需要在数据库中创建一个用于存储评论信息的数据表。可以使用如下的SQL语句创建一个名为comments的表:CREATETABLE`comments`(`id`int(11)NOTNULLAUTO_INCREMENT,`content`varchar(255)NOTNULL,`created_at`timestampNOTNULLDEFAULTCURRENT_TIMESTAMP,PRIMARYKEY(`id`))ENGINE=InnoDBDEFAULTCHARSET=utf8;创建控制器创建一个名为Comment的控制器,代码如下:<?phpnamespaceapp\index\controller;usethink\Controller;usethink\Request;useapp\index\model\CommentasCommentModel;classCommentextendsController{publicfunctionindex(){$list=CommentModel::all();$this->assign('list',$list);return$this->fetch();}publicfunctionadd(Request$request){if($request->isPost()){$data=$request->post();$result=$this->validate($data,'Comment');if(true!==$result){return['error'=>$result];}$comment=newCommentModel();$comment->content=$data['content'];$comment->save();return['msg'=>'评论成功'];}}}创建模型创建一个名为Comment的模型,代码如下:<?phpnamespaceapp\index\model;usethink\Model;classCommentextendsModel{protected$autoWriteTimestamp=true;protected$insert=['created_at'];}创建验证器创建一个名为Comment的验证器,用于验证提交的评论内容是否合法。代码如下:<?phpnamespaceapp\index\validate;usethink\Validate;classCommentextendsValidate{protected$rule=['content'=>'require|max:255',];protected$message=['content.require'=>'评论内容不能为空','content.max'=>'评论内容不能超过255个字符',];}创建路由在application/route.php文件中添加以下路由配置:Route::get('comment','index/comment/index');Route::post('comment/add','index/comment/add');完整代码控制器:application/index/controller/Comment.php<?phpnamespaceapp\index\controller;usethink\Controller;usethink\Request;useapp\index\model\CommentasCommentModel;classCommentextendsController{publicfunctionindex(){$list=CommentModel::all();$this->assign('list',$list);return$this->fetch();}publicfunctionadd(Request$request){if($request->isPost()){$data=$request->post();$result=$this->validate($data,'Comment');if(true!==$result){return['error'=>$result];}$comment=newCommentModel();$comment->content=$data['content'];$comment->save();return['msg'=>'评论成功'];}}}模型:application/index/model/Comment.php<?phpnamespaceapp\index\model;usethink\Model;classCommentextendsModel{protected$autoWriteTimestamp=true;protected$insert=['created_at'];}验证器:application/index/validate/Comment.php<?phpnamespaceapp\index\validate;usethink\Validate;classCommentextendsValidate{protected$rule=['content'=>'require|max:255',];protected$message=['content.require'=>'评论内容不能为空','content.max'=>'评论内容不能超过255个字符',];}路由:application/route.php<?phpusethink\Route;Route::get('comment','index/comment/index');Route::post('comment/add','index/comment/add');注意事项:代码中的路由、控制器、模型和验证器命名空间均为app\index,请根据自己的实际情况进行修改。add()方法接收POST请求,并使用验证器对请求参数进行验证。验证器的规则和消息可以根据实际情况进行修改。Comment模型设置了自动写入时间戳和插入时自动设置created_at字段。add()方法返回JSON格式数据,可根据需要进行修改。

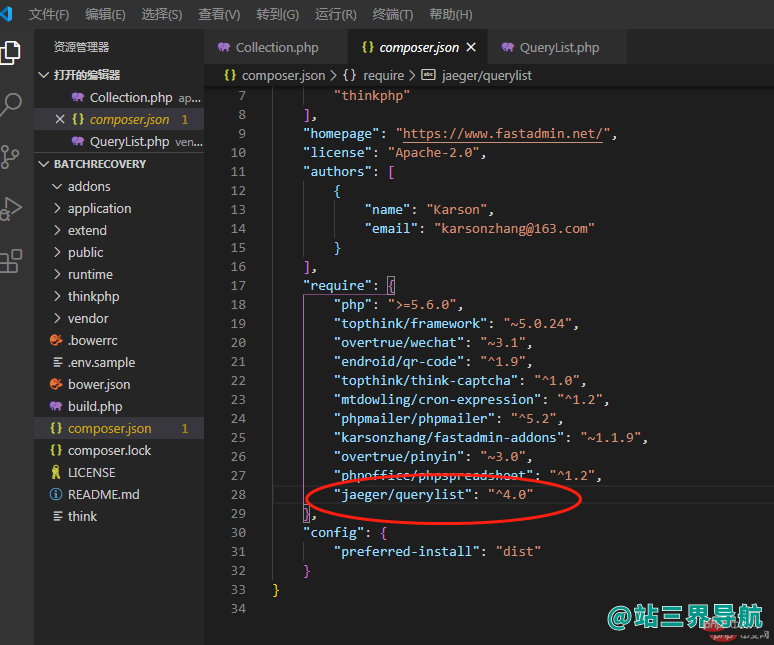
打开composer.json文件;加上"jaeger/querylist":"^4.0"第二步:composerinstall如果安装报错:执行这个:composerupdate--lock如何使用了举个简单的例子6.返回数据:

在TP5.0中,使用Model类进行查询和使用Db类进行查询各有优劣,没有绝对的高效低效之分,具体取决于业务场景和数据访问的实现方式。当需要对数据进行大量、复杂的业务逻辑处理时,可以选择使用Model类进行查询。因为Model类可以通过定义关联关系来方便的进行数据操作,同时也可以进行数据校验、数据事件处理等操作,使得数据操作更加直观、简单。如果只是简单的数据查询操作,Db类的执行效率一般比Model类要高一些,因为Db类对底层的数据库操作进行了封装,执行效率较高。但是需要注意的是,使用Db类进行操作时需要自行编写SQL语句,不会进行数据校验,数据事件处理等操作,需要自己进行处理。综上所述,需要根据具体业务场景和数据访问来选择使用Model类或Db类进行查询,以达到最优的查询效率。

安装redis拓展在宝塔面板的软件管理中心搜索redis,然后点击安装,就会自动安装好redis拓展。配置缓存参数在config目录下修改cache.php文件,找到下面的代码段:'default'=>['type'=>'File','path'=>CACHE_PATH,'prefix'=>'','expire'=>0,'serialize'=>true,],将其中的type改为redis,然后添加redis的配置参数,如下所示:'default'=>['type'=>'redis','host'=>'127.0.0.1','port'=>6379,'password'=>'',//如果有密码请填写'select'=>0,//缓存的库号,默认是0'timeout'=>0,//超时时间,默认是0秒'persistent'=>false,//是否使用长连接'prefix'=>'','expire'=>0,'serialize'=>true,],其中,type表示使用的缓存类型,这里设置为redis。其他参数的含义如下:host:redis的主机地址port:redis的端口号password:redis的密码,没有则为空字符串select:缓存的redis数据库编号,默认为0timeout:连接redis的超时时间,默认为0秒persistent:是否使用长连接,默认为falseprefix:缓存键前缀expire:缓存数据有效期,单位为秒,0表示永久有效serialize:是否序列化缓存数据,默认为true使用缓存使用redis缓存和使用文件缓存的方法基本相同,如下所示:usethink\facade\Cache;//写入缓存Cache::set('key','value',3600);//将value缓存到key中,有效期为3600秒//读取缓存$value=Cache::get('key');//从缓存中读取key对应的值//删除缓存Cache::delete('key');//删除key对应的缓存//判断是否存在缓存if(Cache::has('key')){//缓存存在}else{//缓存不存在}这里使用了thinkphp的缓存门面类Cache来进行操作,需要先加上use语句。以上就是使用宝塔面板和thinkphp5.0进行redis缓存的方法及详细步骤和注释。希望对你有所帮助。

Db::startTrans()是基于ThinkPHP框架的数据库操作类Db的方法之一,用于启动一个事务。在数据库中,事务是一组操作,这些操作要么全部执行成功,要么全部回滚撤销。通过使用事务,我们可以将多个操作视为一个整体来进行处理,从而保证数据的完整性和一致性。当我们需要对数据库进行多个操作时,可以使用Db::startTrans()方法来开启事务,在事务中执行这些操作,然后通过commit()方法提交事务或者通过rollback()方法回滚事务。例如,以下代码演示了如何使用Db::startTrans()方法来执行一个事务:try{//开始事务Db::startTrans();//执行多个SQL操作Db::name('user')->where('id',1)->update(['name'=>'Tom']);Db::name('order')->where('user_id',1)->delete();Db::name('record')->insert(['user_id'=>1,'action'=>'edit']);//提交事务Db::commit();}catch(\Exception$e){//回滚事务Db::rollback();echo$e->getMessage();}在这个例子中,我们首先使用Db::startTrans()方法开启了一个事务,然后执行了三个SQL操作:更新用户表中id为1的用户的名字为Tom、删除订单表中user_id为1的记录、向记录表中插入一条数据。最后通过Db::commit()方法提交事务,或者如果发生异常则通过Db::rollback()方法回滚事务。

try{'数据库操作';Db::commit();$this->success("成功")}cathe(\Exception$exception){Db::rollback();$this->error("成功");}问题解析:$this->success();的源码其实也是会抛出异常解决方法:将catch(\Exception$exception)改成catch(\think\Exception\DbException$exception)

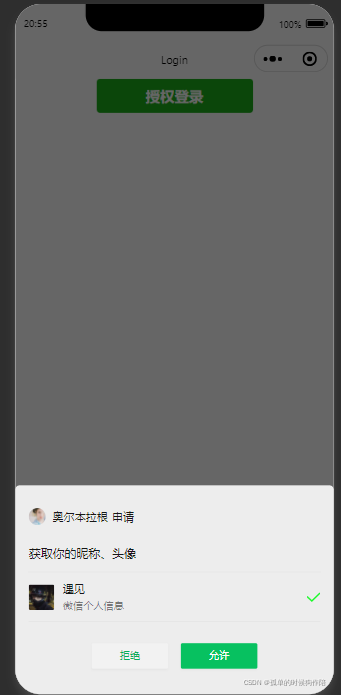
效果wxml页面给button绑定冒泡事件,也就是我们说的点击事件<buttonbindtap="getUserProfile">授权登录</button>js页面 这里wx.getUserProfile方法可以从底部弹框提示用户授权,success是用户确认授权回调方法, 可以console.log(result)查看以下数据,可以在userInfo中获取用户的一些基本信息,例如头像,昵称。通过wx.login()获取微信平台提供给我们的code(5分钟内有效,每次请求code都不一样),有了code我们就可以通过wx.request()向后端发起请求了getUserProfile(e){letthat=this;wx.getUserProfile({desc:'展示用户信息',success:(result)=>{//接收名称和头像letnickName=result.userInfo.nickName;letavatarUrl=result.userInfo.avatarUrl;wx.login({timeout:10000,success(res){letcode=res.code//获取codewx.request({url:'http://www.day12.com/login',method:'post',data:{code:code,nickName:nickName,avatarUrl:avatarUrl},success:ret=>{console.log(ret)}})}})},fail:(res)=>{console.log(res)},complete:(res)=>{},})},php后端通过code和自己开发平台的appid和appSecret调用微信平台提供给我们的url获取openid和session_key,这里我们可以用file_get_contents()或者curl都可以functionlogin(){$code=request()->param('code');$nickName=request()->param('nickName');$avatarUrl=request()->param('avatarUrl');$appId="";//appid$appSecret="";//填写你微信公众开发平台的appSecret$url="https://api.weixin.qq.com/sns/jscode2session?appid={$appId}&secret={$appSecret}&js_code={$code}&grant_type=authorization_code";//获取openid和session_key$userInfo=json_decode(file_get_contents($url),true);$userData=['nick_name'=>$nickName,'avatar_url'=>$avatarUrl,'open_id'=>$userInfo['openid'],'session_key'=>$userInfo['session_key']];$user=newUser();//根据openid查询用户数据判断用户数是否首次登陆$res=User::get(['open_id'=>$userInfo['openid']]);if($res){//返回查询数据的id//更新用户昵称头像$id=$res->id;$user->save(['nick_name'=>$nickName,'avatar_url'=>$avatarUrl],['id'=>$id]);}else{$res=$user->save($userData);//新增$id=$user->id;}returnjson(['code'=>200,'msg'=>'success','data'=>$id]);}sql user表CREATETABLE`user`(`id`int(10)NOTNULLAUTO_INCREMENT,`user_name`varchar(20)CHARACTERSETutf8COLLATEutf8_unicode_ciNULLDEFAULTNULLCOMMENT'姓名',`phone`varchar(15)CHARACTERSETutf8COLLATEutf8_unicode_ciNULLDEFAULTNULLCOMMENT'手机号',`nick_name`varchar(30)CHARACTERSETutf8COLLATEutf8_unicode_ciNULLDEFAULTNULLCOMMENT'昵称',`avatar_url`varchar(150)CHARACTERSETutf8COLLATEutf8_unicode_ciNULLDEFAULTNULLCOMMENT'头像',`open_id`varchar(30)CHARACTERSETutf8COLLATEutf8_unicode_ciNULLDEFAULTNULL,`session_key`varchar(50)CHARACTERSETutf8COLLATEutf8_unicode_ciNULLDEFAULTNULL,`create_time`datetime(0)NULLDEFAULTNULL,`last_time`datetime(0)NULLDEFAULTNULL,`update_time`datetime(0)NULLDEFAULTNULL,PRIMARYKEY(`id`)USINGBTREE)ENGINE=MyISAMAUTO_INCREMENT=12CHARACTERSET=utf8COLLATE=utf8_unicode_ciROW_FORMAT=Dynamic;模拟数据INSERTINTO`user`VALUES(1,'张三丰',NULL,'遇见','https://thirdwx.qlogo.cn/mmopen/vi_32/Q0j4TwGTfTLu9S5py5YgSdCUiaHW38VMWxibgubhUHBcx5fb3tm84Z3c0kmONh','',NULL,NULL,NULL,'2022-01-1816:54:52');INSERTINTO`user`VALUES(2,'梨花带雨',NULL,NULL,NULL,NULL,NULL,NULL,NULL,NULL);INSERTINTO`user`VALUES(3,'大马路法拉',NULL,NULL,NULL,NULL,NULL,NULL,NULL,NULL);INSERTINTO`user`VALUES(4,'编程浪子',NULL,NULL,NULL,NULL,NULL,NULL,NULL,NULL);INSERTINTO`user`VALUES(5,'被罚款九分裤',NULL,NULL,NULL,NULL,NULL,NULL,NULL,NULL);INSERTINTO`user`VALUES(6,'翻看积分',NULL,NULL,NULL,NULL,NULL,NULL,NULL,NULL);INSERTINTO`user`VALUES(7,'法方面来看',NULL,NULL,NULL,NULL,NULL,NULL,NULL,NULL);INSERTINTO`user`VALUES(8,'大鱼',NULL,NULL,NULL,NULL,NULL,NULL,NULL,NULL);INSERTINTO`user`VALUES(9,NULL,NULL,'遇见','https://thirdwx.qlogo.cn/mmopen/vi_32/Q0j4TwGTfTLu9S5py5YgSdCUiaHW38VMWxibgubhUHBcx5fb3tm84Z3c0kmONh',NULL,NULL,'2022-01-1816:47:50',NULL,'2022-01-1816:47:50');INSERTINTO`user`VALUES(10,NULL,NULL,'遇见','https://thirdwx.qlogo.cn/mmopen/vi_32/Q0j4TwGTfTLu9S5py5YgSdCUiaHW38VMWxibgubhUHBcx5fb3tm84Z3c0kmONh',NULL,NULL,'2022-01-1816:48:15',NULL,'2022-01-1816:48:15');SETFOREIGN_KEY_CHECKS=1;